
So basically I’m actually hosting this blog on my own personal server that is running on my old laptop.
Currently using Ubuntu 24.04.3 LTS to run my server and it’s working pretty well. Prior to this I actually had some experience running a Linux server(ubuntu) because I wanted to run a Minecraft Server separately from my main system, and that experience actually made setting up this blog a lot more easier.
____________________________________________
Step 1 – Installing Ubuntu Server
During this step I basically downloaded the Ubuntu server ISO (Ubuntu 24.04.3 LTS) and used Rufus to etche it into a pendrive I had lying around.
Then it’s all smooth sailing on the installation. Plopped the USB into my old laptop, a few clickity and some clackity, and we’re done! Ubuntu server installed.
Step 2 – Downloading the Apps I Needed
- SSH
- To be able to control the server directly from my main machine
- NGINX
- The doorman
- Receives request and designate where it should go in the server and what to give to the requester
- Basically a web server receptionist
- PHP
- The chef, interpreter, mastermind
- Basically it’s the one generating the webpage that will be projected to the user/visitors of my blog
- MariaDB
- The database for my blog
- Basically all the data from posts, users. passwords, comments, settings and other data are stored in this storage space
- WordPress
- The app that I’m using to run the blog
- A website system written in PHP
Basically this it how it goes, when someone visits my website from the internet, the DuckDNS domain directs them to my server. Nginx receives the request and manages the traffic, deciding how it should be handled. It then passes the request to PHP, which runs the WordPress code. WordPress uses MariaDB to get or save website data like posts and users. Finally, the completed webpage is sent back through Nginx to the visitor’s browser.
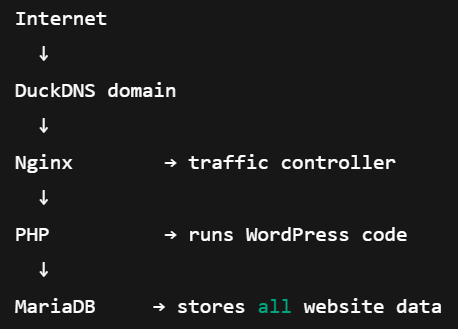
A simple diagram to make things easier to visualize
Step 3 – Port Forwarding
This basically means connecting my website the the WORLD WIDE WEB (WWW), It’s nothing daunting really, it’s just tinkering with the router settings and allowing me and other people with different WIFI to be able to access my server. In simpler terms allowing public internet traffic to reach the Ubuntu server.
Step 4 – DuckDNS
DuckDNS was briefly mentioned above. So what is it? Well, to be able to access my blog you’ll need to know the location right? So basically I have to share my Internet Protocol (IP) Address for other peeps to access my blog, However, it’s actually dangerous to share your IP as people can track your location down and even ddos you. So what’s the solution? DuckDNS of course! DuckDNS is free service that gives your home server a fixed web address, to my home internet IP. With this, I just need to share my web address and not my real IP address which is much safer overall.
Step 5 – Cron Job for DuckDNS
So what does this do exactly? Well remember the IP address I’ve mentioned above? Well this IP address is constantly changing and in the most simple terms, I have to keep updating my new IP address to my fixed web address everytime it changes randomly. It sounds like a hassle right? Well, Cron Job has a solution for this. Basically A cron job is a scheduled task on Linux.
for DuckDNS, the cron job’s only job is to regularly tell DuckDNS my current IP address and automatically update it every 5 minutes.
Step 6 – Enable HTTPS with Certbot
This is the final step of the setup: by default, DuckDNS gives me an HTTP website, which sends data in plain text and can potentially be read by others, so I upgraded it to HTTPS, which encrypts all traffic to keep the connection secure and protect visitors’ data. Basically making the website safer for both me and you guys visiting my blog.
____________________________________________
That’s about it! I’m gonna attach a file below with more details with some of the code used in the process. For those who are interested, you guys can just read the file and feel free to ask any questions in the comments if you wanna know more about the process. Any and all advice are also welcomed because I’m still new to this and may have made some mistakes on the way HAHA!
2 replies on “How I made the blog”
cool website, can add more dank memes for the cool teens
Indeed will be more dank and hip for the kids to memefy the singularity.